
Hammertime is reader-supported. When you buy through links on our blog, we may earn commissions.
You can probably tell by now that Stephen and I usually have our own roles with this whole DIY thing… Stephen is the builder, and I am the painter/stainer/blogger. Well, ladies and gentleman, that has ALL changed. 😉 I have officially done my first ever, just me, no help, from start-to-finish project! And I am so proud of myself!
I had bookmarked a couple of items that I thought I could handle, and decided to start with a decorative ladder. Not only was this fairly easy, but it cost me less than $7 to build! Let me walk you through what all I did. (The good AND the bad… because you know there’s gonna be some bad in there 😉
Supplies:
-three 1×3 inch furring strips, 8 footers (these can be found at Home Depot or Lowe’s, and ran about $2 each)
-twenty 2″ wood screws
-stain/paint of your choice
-tape measure
-square ruler, if possible
-circular saw
-screwdriver

Steps:
1. First, I stained the three pieces of wood. I did one coat, so I had to let these sit outside for a good 3 hours.


**NOTE: Once I stained them, I noticed how rough they were. Yeah, yeah, I know- this should have been obvious from the get-go. The roughness was kind of nice for the “rustic” look but was just too rough to the touch. I used the power sander with a 220 grit (I used a higher number since I just wanted to smooth the boards). It helped a good bit, but these boards are made to be a bit rougher than normal. If you do this, I’d recommend sanding FIRST!
2. I stained them again, since the sander took off some of the original stain. Another 3 hours to wait!

3. Once these boards were dry (again!), I pulled out the tape measure and measured out what I needed. I had to cut:
-2 longer pieces at 72 inches each (these are the sides of the ladder)
-5 shorter pieces at 16 inches each (these are the rungs)
**I used the tape measure and made a mark where the measurement hit on the board. I then used a square ruler to draw a line across the width of the board so I could make sure my saw cut would be straight.


4. Once all the marks were made, it was time to cut!
**The circulating saw we have has a nice light feature where it casts a lined shadow on where it will cut. I made sure this line matched up with my drawn line.


5. I laid out one piece of the 72″ wood on its skinny side, and took my 5 smaller pieces and arranged them out to where I wanted them to be and made marks with a pencil. I measured and made sure they were spaced about the same (mine were around 13 inches apart).
6. I laid a small, 16″ piece of wood on top of a scrap piece of the 1×3 wood and put it where I wanted it to be on the ladder. Note: The small pieces need to have their wider sides facing out. I then took two screws and screwed the wood piece in. I repeated this for the other 4 rungs.
**It will be very helpful to have someone push against you drilling into the side. This wood is very lightweight, so having that pressure helps drill in the screws easier!


7. Once all five rungs were screwed in, I lined the other 72″ piece on the other side, making sure it was exactly equal with the other 72″ piece. I then screwed it into the attached rungs, using two screws for each rung.

8. I used wood filler to fill in the screw holes. Also, I split the wood in about 3 spots while screwing in the screws (whoops!). I had reversed the screws and re-drilled them in straight each time, and I used wood filler to help repair these spots.


9. After a day of letting the wood filler dry, I lightly sanded (not with the power sander, just a piece of higher-grit sandpaper) the spots. I then re-stained the whole ladder!

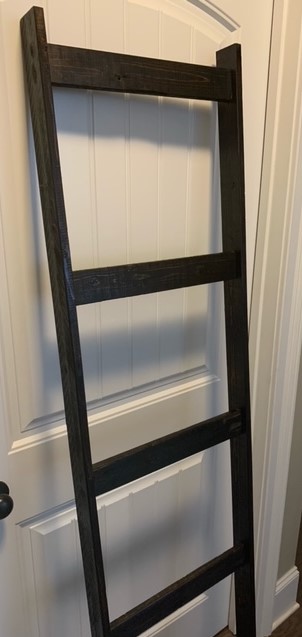
I let this bad boy dry a whole week, just to make sure all those coats of stain were completely dry. It’s amazing how sticky stain can be! Here is the final product:


I’m so proud of myself! For less than $7 and a few hours of my time, I was able to add a cool decorative piece to our house. I probably left out some of the boring specifics of the process, so if you’re thinking about making one of these and have any questions, don’t hesitate to reach out.